Data preparation
Data type supported
Nucleome Browser supports multimodal data for visualization and exploration. For genomic data, Nucleome Browser supports data in bigBed, bigWig, tabix, and .hic format. For imaging data, Nucleome Browser utilizes the OMERO server to host imaging data. The supported formats of imaging data for the OMERO server are listed on the OMERO’s website. Users can explore thumbnails of image on the genome browser panel and view the raw image on OMERO.iviewer. For 3D genome structure data, Nucleome Browser uses a custom format called nucle3D that can be easily transformed from popular formats such as cmm. The details on the nucle3D format is shown here.
Genomic data
We provide a command-line tool (NucleServer) or its GUI version (NucleData) to host your data server across macOS, Windows, and Linux systems. Both NucleServer and NucleData start a local data server using a configuration file/link provided by the user. Once the data server is started, it will connect to the Nucleome Browser hosted in our main portal (https://vis.nucleome.org or http://vis.nucleome.org) and you can load the data from your local data server in Nucleome Browser main portal. NucleServer and NucleData for different platforms can be downloaded from GitHub.
NucleServer and NucleData
Installation
Once the program is downloaded, make sure to use the chmod command to make the program executable in Linux and Mac system as shown below:
# NucleServer
chmod +x nucleserver
# NucleData
chmod +x nucledata
In Windows, the command-line tool such as Windows Terminal and PowerShell will be required to run NucleServer. Alternatively, you can download the latest source code and compile it. NucleServer is written in GoLang ( version 1.11+ ) and hosted on Github. After the Golang environment is installed, the source code can be cloned using the following command.
# clone the latest source code from GitHub
go get -u github.com/nucleome/nucleserver
Prepare a configuration file
Both NucleServer and NucleData require an Excel file to specify the source of data and their configurations. We recommend you create this Excel file using the Google Sheet and downloading it in the .xlsx format so that you easily share it with others. Alternatively, you can create an Excel file using Microsoft Excel software. A template of the configuration Excel file can be downloaded from https://vis.nucleome.org/static/ndata/cnb.xlsx.
Fig. 53 shows the overall architecture of the configuration Excel file. The configuration file (.xlsx format) is formulated as 2+ worksheets.
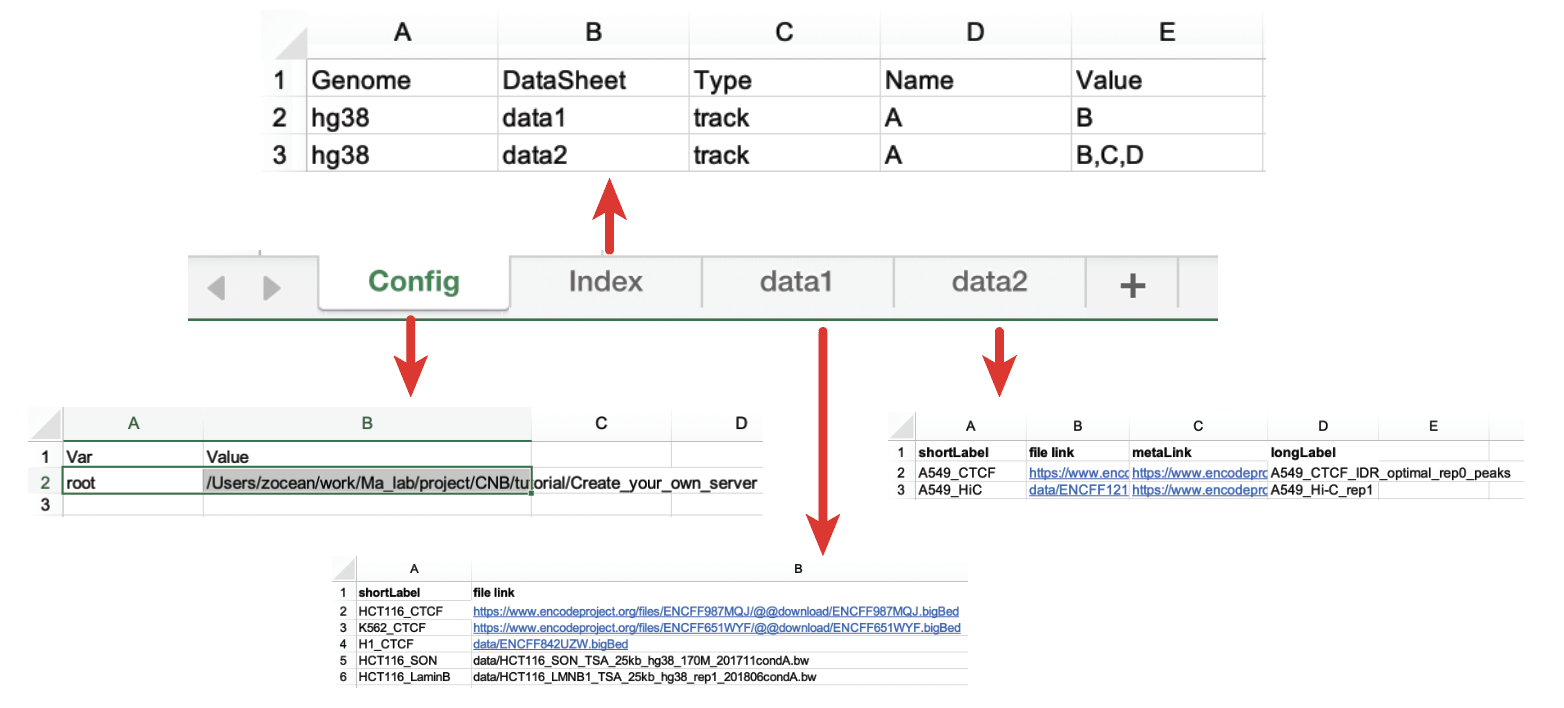
Fig. 53 The overall structure of the configuration Excel file
The first worksheet must be named as Config, and the second one must be named as Index.
The rest worksheets contain the details of the source of data and configuration.
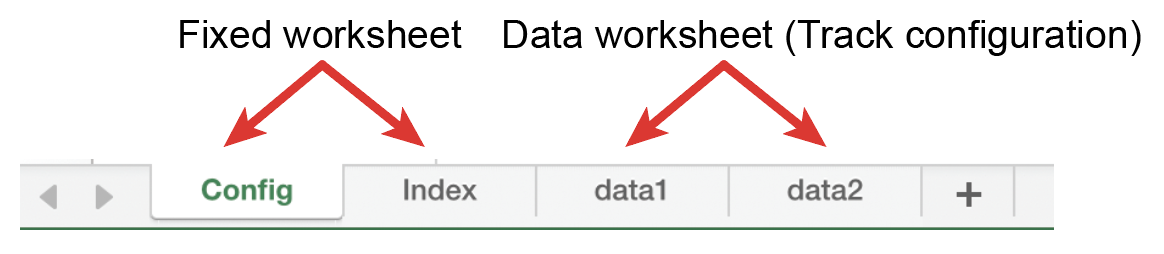
Fig. 54 Examples of the worksheet in a configuration file
Config sheet:
The Config worksheet contains global parameters. The first row of the Config worksheet is the header and should be named as
VarandValue, respectively. Currently, therootparameter under the column of Var is the only parameter required for NucleServer and NucleData. Thisrootparameter stores the root path for all genomic data files that are stored on the local computer. The purpose of this parameter is to help users conveniently migrate data between computers. For example, if all the files are stored in a folder under the path (/home/tom/project/genomic-data/), you can set the value of root in the column of Value as /home/john/project/genomic-data/. Later, when you fill in the worksheet of data, you can just put the filename of a data in the file link column (see below) and NucleServer and NucleData will know where to look for these files. It is possible that some of the data are stored in the cloud. In that case, you can just put the URLs of data in the worksheet of data. NucleServer and NucleData assume that file links of data that do not start with HTTP or HTTPS are all stored locally on your computer.
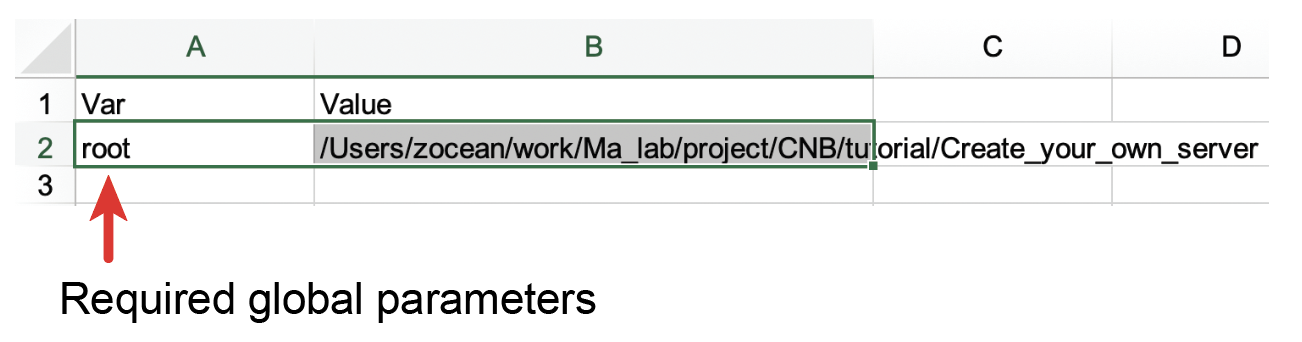
Fig. 55 Required parameters in the Config worksheet
Index sheet:
The Index sheet contains the info of all the Data Sheets. The meaning of each column is shown in Fig. 56. The first row of the Index sheet is the header. Each row indicates one data worksheet. The first column is the genome assembly of data. Nucleome Browser supports all the reference assembly provided by the UCSC genome browser. The genome assembly name should be in lowercase letters and all data in that data worksheet is based on the same genome assembly. The second column is the name of a specific data worksheet. The third column is set for future features and is currently not used (you can put ‘track’ here).
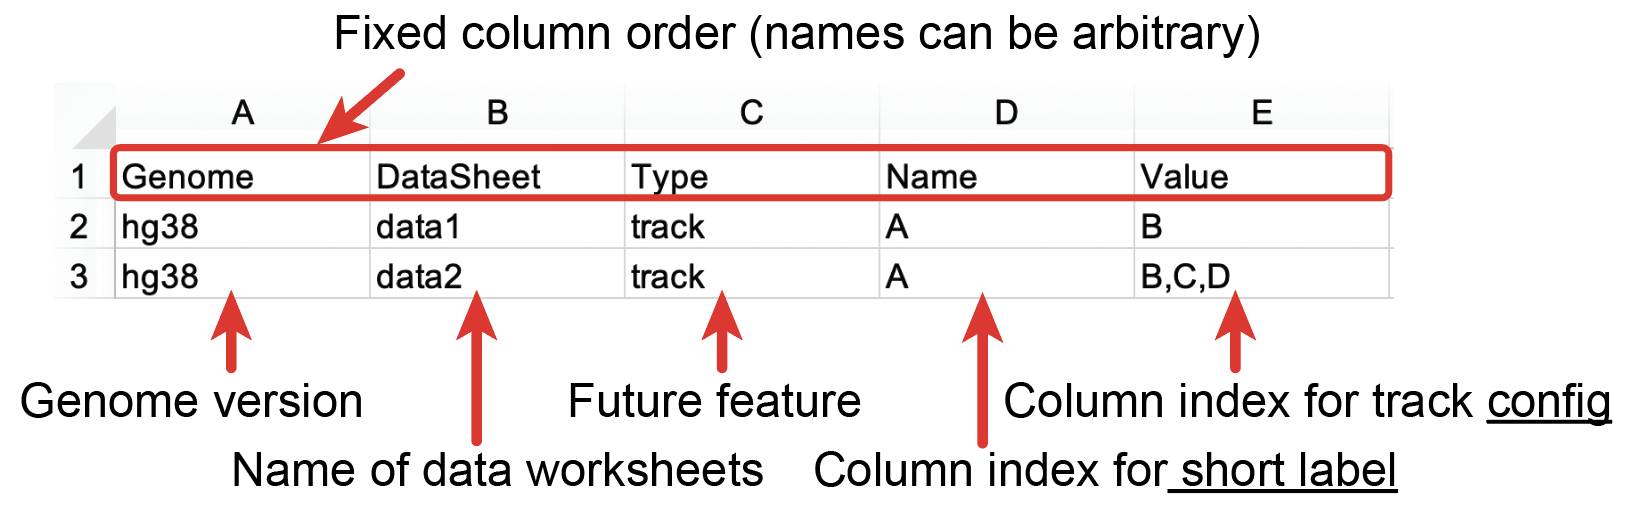
Fig. 56 Scheme of the Index worksheet
Data sheet
The fourth and fifth columns of the Index sheet contain the most important parameters of data. There are two types of ways to configure this column: two-column setting and four-column setting. The fourth column indicates the short label of each data. In the two-column setting, the fourth column is the column index of the short label of each data, and the fifth column refers to the column index of the file path (or URL) in the data worksheets. In the four-column setting, the fourth column is the column-index of the short label of each data, and the fifth column refers to the column-index of the file path (or URL), URL of meta-information, and long label. Note that in the four-column setting, the order of the column-index must be the file path, URL of meta-information link matters. The column-index of the file path in a data worksheet can be arbitrary but it must be the first one in the fifth column in the Index sheet.
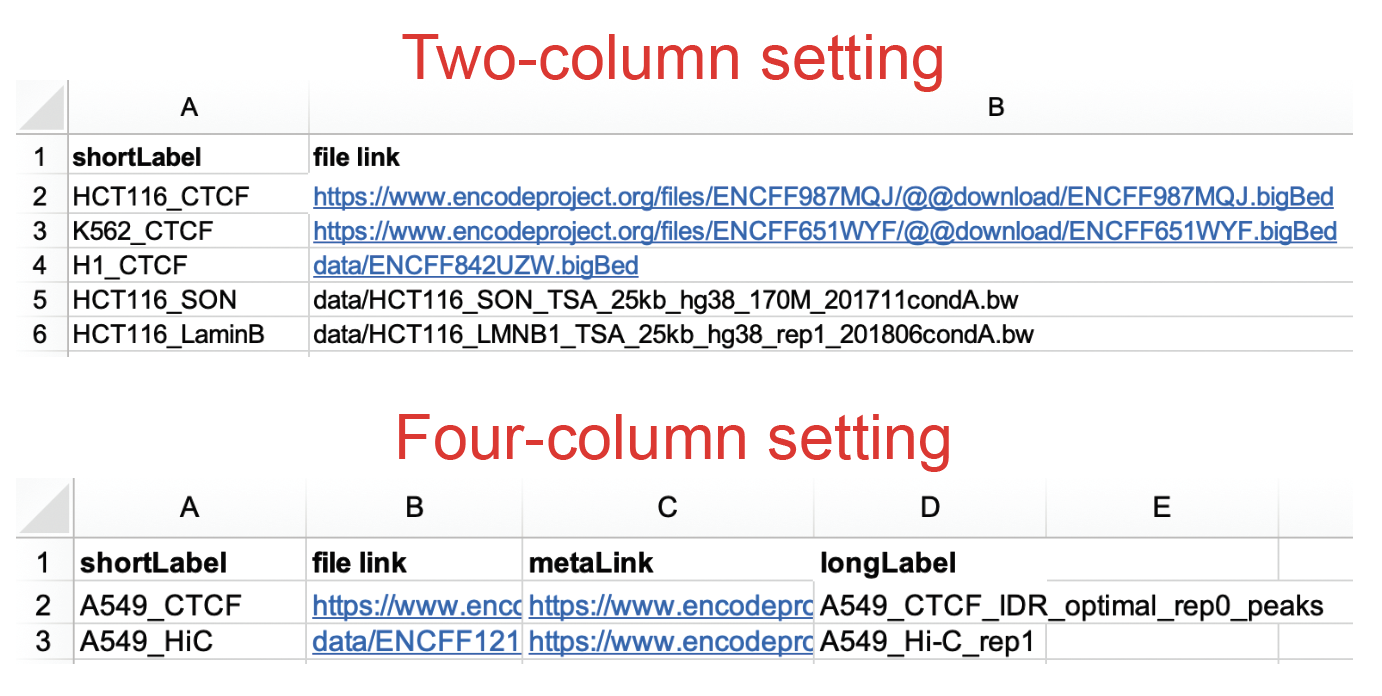
Fig. 57 Scheme of the Data worksheet. In the two-column setting, the shortLabel and file link is required. In the four-column setting, shortLabel, file link, metaLink, and longLabel are required. Note that the first row is the header and can be named to anything. Other data can be stored in other columns. The order of columns does not matter, as long as the order index of the column is correct in the Index worksheet.
BigBed and bigWig files are binary indexed files with data in multiple resolutions.
For data stored on the web, NucleServer and NucleData will only fetch index files (usually only less than 1% size of the original file) from web links and store them locally.
The default location for storing the index files is <user's home directory>/.nucle/index.
However, we highly recommend downloading .hic files to your local computer and host them locally to provide the fastest speed of browsing.
Start a data service
Start a local server using NucleServer and NucleData is very simple. The command to start a server in Mac OS or Linux using NucleServer is the following.
./nucleserver start -i [path to the excel configuration file] -p [port default:8611]
The command to start the server in Windows is the following:
nucleserver.exe start -i [path to the excel configuration file] -p [port default:8611]
By default, the local server will use the 8611 port. You can change that by setting the -p argument. In NucleServer, if everything goes fine, you should see a log similar to below.
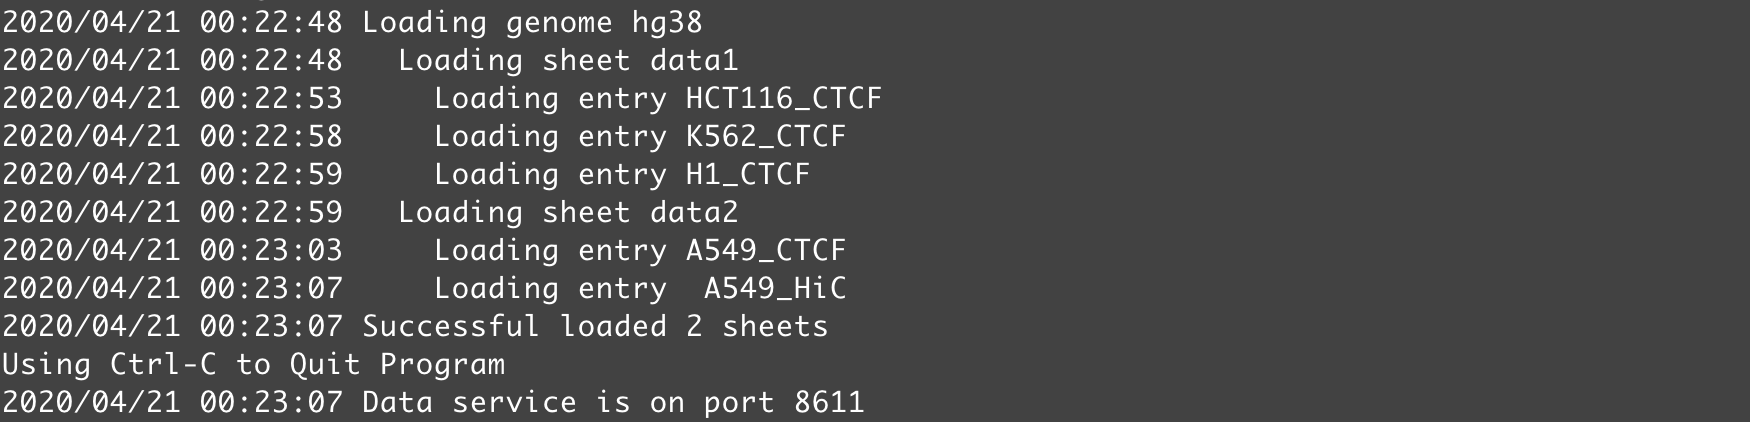
Fig. 58 Screenshot showing a log of NucleServer starting a local data server
If you use NucleData, just follow the instructions on the interface to load the Excel file and set the port manually as shown below:
Next, go to Nucleome Browser by typing http://vis.nucleome.org in your web browser. Go to the default genome browser panel or create a new genome browser panel.
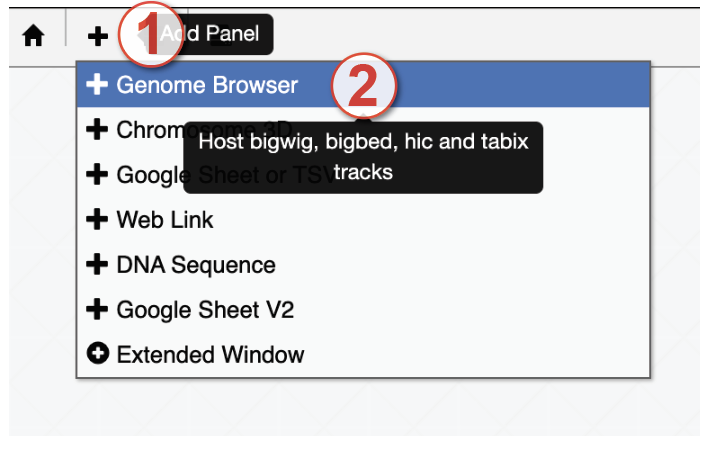
Fig. 59 Steps to create a new genome browser panel
If you use the default port 8611, this local data server should automatically load in the Nucleome Browser.
Otherwise, you can load it manually by following the procedures in Fig. 60.
First, click the config button in the genome browser panel as shown in Step 1 in Fig. 60.
In the configuration interface, click the data server setting button (gear icon in step 2 in Fig. 60.
In the data server setting menu, type a name for your data server in the Id column and type the web link of your local data server (e.g., http://127.0.0.1:<port id>, here port id is the port specified in NucleServer or NucleData) in the URI column.
Click the fresh button.
Click the Update button to refresh the interface and you should see Active (in green text) in the rightmost column.
Finally, select the tracks you want to visualize from the selection boxes of tracks and click the config button again to return to the interface of the genome browser.
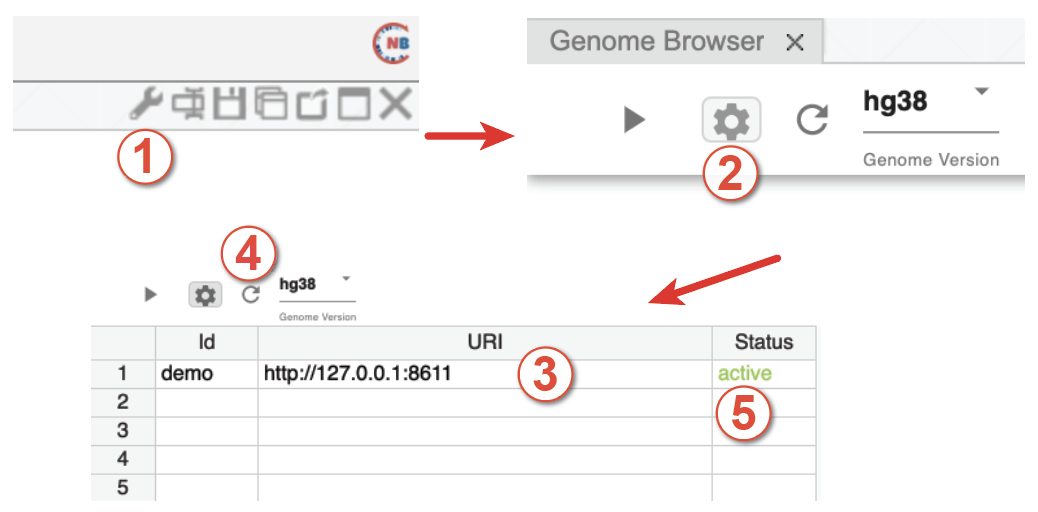
Fig. 60 Five steps to manually load local data servers. Users can organize their local data server using the local server configuration interface.
Prepare the configuration file using public Google Sheet
NucleServer also supports using a Google Sheet as a configuration file in the cloud. This feature is particularly useful when you want to share your data server with others. Others can simply start a data server using the public URLs of this Google Sheet. To do that, you need to first prepare a configuration file using Google Sheet and make this Sheet public (anyone with the link can access this sheet, if this sheet is private only you can use it to start a local data server, see below). Next, you need to identify the unique ID of this Sheet.

Fig. 61 An example of Google Sheet ID
Finally, you can start your server using the Google Sheet ID as shown below:
nucleserver start -i <Google Sheet ID>
Note that if this is the first time you use NucleServer with Google Sheet, it will firstly print a web link in the terminal, asking for permissions.

Fig. 62 For the first time to connect NucleServer to Google Sheet, you need to permit NucleServer to read the data on your public Google Sheet.
Open that link in a web browser, log in using your Google account, and grant the permissions.

Fig. 63 Permit NucleServer using your Google account
Once this is done, Google should provide you a token in response. Copy this token and paste it in the terminal to finish this process and your local server is ready to use.
Fig. 64 Copy the token back to the terminal
A credential token will be stored in [Your Home Dir]/.nucle/credentials/gsheet.json so that next time you do not need to permit NucleServer to read public Google sheet on your Google account again.
Host private data in a remote server
We also provide a simple password protection option (currently experimental) for NucleServer.
To do that, simply add an argument -c with a password when you start a local data server.
nucleserver start -i nucle.xlsx -c password
To visualize those private data in the Nucleome Browser, users have to first log in with the password through the following web page.
http://[yourwebsite]:8611/main.html
3D structure data
The nucle3d format
In Nucleome Browser, the 3D structure panel uses the nucle3d format to prepresent the 3D structure of chromatin.
An example of a nucle3D file is shown below. Each file represents a 3D structure of chromatin with a fixed bin size. The first several rows (tab-delimited) indicate the name (TITLE) of this structure, genome assembly version (GENOME), and bin size (BINSIZE). Note that the nucle3D format requires that all chromatin segments have the same bin size and those chromatin segments are non-overlapping. For each chromosome, a row starting with CHR tells to which chromosome the following bins belongs. Then, the following bins show the bin-id (0-base) and XYZ positions of this chromatin segment. For example, if the bin-size is 100kb, the first bin (0 to 100kb) should have bin-id 0. Bin-id and XYZ positions are separated by comma as shown in the example below. You can skip bins if there is no data on those bins.
Support for variable bin sizes, diploid genome, and visualization of nuclear bodies will be added in the next version of the Nucle3D format.
TITLE   [NAME]        # Tab split
GENOME  hg38          # Tab split
BINSIZE [binsize]
CHR chr1 # Tab split
i,x,y,z
i,x,y,z
..
CHR chr2
..
We also provide multiple useful tools to help users prepare data/web service to visualize genome 3D structure data in Nucleome Browser. Those tools can get from https://github.com/nucleome/nucle.
Host 3D structure using nucleserver
You can use nucleserver to host custom 3D structural data. Please follow the instruction on nucleserver repo to install it.
You can put all 3D structural data in a folder (e.g. 3D). You can then start a data service to host these data using the following command.
# assume the folder 3D contains the structural data, each file represent a 3D structure
nucleserver file --root 3D
You should see a message like this “Please open http://127.0.0.1:8611”. This means that all the 3D structural data can be retrieved under URL http://127.0.0.1:8611/get/. You can copy the URL of the 3D structural data into the input data box in the 3D structure panel of the Nucleome Browser.